Tuesday, March 23, 2010

Colored Rice

Most of us don't want to deal with glitter, so we turn to sequins and other sparkly objects instead.  You can make your own colored rice as another alternative!

WHAT YOU NEED
white rice
white vinegar
food coloring


WHAT YOU DO
Combine 1/2 cup white rice, 5 drops of food coloring and 1/2 teaspoon vinegar.  


Stir until the food coloring is evenly distributed.  


Spread on a baking sheet covered in parchment paper.  


Bake at 200 degrees for 45 minutes to dry. Store in plastic baggies when cooled.


IDEAS FOR USE
sprinkle rice over glue on a piece of paper, dig for buried treasures in a bucket of colored rice, pour into jars and seee what patterns you can make... other ideas?  Leave your comments below!

Sunday, March 7, 2010

Craft Box

I'm thinking about putting together a craft box to have on hand.  I'm still using craft supplies with my son that I had when I was in high school. I won't tell you how old those supplies are.  We won't use all the supplies all the time, but it would be nice to have them when I want to do a special project.

Here are some ideas of supplies to keep on hand, put together by the seasoned mamas around me:

  • apron
  • bag of craft buttons
  • bag of craft feathers
  • boondoggle string
  • chalk
  • cheap stickers
  • clear contact paper
  • colorful tissue paper (leftover from wrapping gifts - cut some into squares/shapes and store in baggies)
  • construction paper (sheets)
  • construction paper (cut into shapes and store in baggies)
  • cookie cutters
  • crayons
  • Dixie cups (for pouring glue into)
  • finger paints
  • foam sheets
  • fun looking canisters
  • glitter
  • glitter/regular glue in little tubes
  • glue dots
  • glue sticks
  • googly eyes (aka wiggle eyes)
  • kid scissors
  • markers
  • old spice jars (for storing glitter)
  • paper plates (cheap, thin; large, small)
  • paper towel or toilet paper rolls
  • pipe cleaners
  • pompoms
  • q-tips (for dipping into and smearing glue)
  • sequins
  • tacky glue
  • tongue depressors
For storing these items, I will probably find a large-ish tub with a lid from Target.  I would love to keep everything in one place!

These items can all be found on Amazon, Toys R Us, Michaels, etc.  You can also check Oriental Trading Co.!

Now it's your turn - leave a comment letting me (and my readers!) know what your favorite go-to craft supplies are.

Wednesday, February 10, 2010

Fun with the Ironing Board!

I got this idea from my friend Tasha over at ThriftLiving.com.

Use your ironing board as a ramp for cars and balls and other things that go!


We laid one end up against the couch and raced cars, trucks and balls to see whose went the farthest.  Tasha also had a great idea to turn it into a fort, but it didn't work with our set-up.


Every time my son sees the ironing board now he jumps around saying "Racing cars! Racing cars!"  LOL

Saturday, January 30, 2010

New Look for a New Year

I'm done neglecting this blog.  Google analytics tells me that there's dozens of you who check this blog every single day even though I haven't posted in nearly a month.  I'm done letting you down!

I've redesigned this blog (the background is my own toddler's artwork! :::swoon:::) and I promise to start posting more ideas.  I'm also going to pull my toddler away from the tv and start directing his energy towards more productive activities....

Monday, January 4, 2010

I-Spy

My toddler doesn't always like to sit in the stroller when we're out for a walk and sometimes I need to get us home in a hurry so I can't let him walk.  One day when I couldn't let him out of the stroller to walk, I kept him entertained by playing a sort of "I-Spy" game.  He LOVED it and it's now a favorite game whereever we go.

All I do is ask him questions - and this is great for teaching shapes, colors, numbers, etc.:
"Can you find something green?"
"Show me something round."
"Point to something with letters (or numbers)."
"Do you see anything that flies?"
Yesterday I even tried "Show me the TALLEST tree you can see" (and he did it!).

If your tot can't find something triangle-shaped/blue/with feathers/etc., show him what you were seeing.  Or if they find one orange object but there were three, point out one of the others.  This game is even great in the grocery store!

Sunday, December 20, 2009

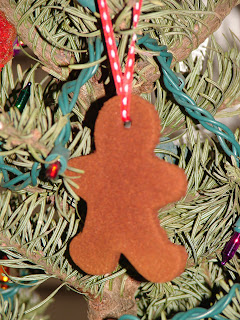
Cinnamon Applesauce Ornaments


MATERIALS
applesauce (store bought, not homemade)
cinnamon (bulk)
white glue
wax paper
rolling pin
cookie cutters
one drinking straw
ribbon, rafia, etc. for hanging

WHAT YOU DO
You want a one-to-one ration of applesauce to cinnamon.  1/4 cup to 1/2 cup each should be fine.  Measure out the cinnamon and applesauce for your tot, then let him pour it into a mixing bowl.  Let him stir and then finish off the mixing for him.  Add a bit of white glue (up to a tablespoon).

Lay out a sheet of wax paper sprinkled with cinnamon so your "dough" doesn't stick.  Cover rolling pin with cinnamon also and help your child roll out the dough into a thin, flat sheet.  If the dough seems too wet, just add more cinnamon.  Let your toddler cut out shapes with cookie cutters then use a straw to poke a hole at the top where you will hang with ribbon.  You can also use a template and trace around that - try tracing your child's hand!

Dry in a 200 degree oven for two hours (turning once) or let air dry for 24-48 hours.

Hang with a festive ribbon!  Try decorating some with clear sparkle sugars (I used red because that's what we had but the clear/white ones would look SO much better!).  You can also add them to your potpourri dish, they smell SO yummy!


Thursday, December 17, 2009

Fun Crayons for Little Hands

I got this idea from my friend Steph over at Mada's Place.  Following Steph's directions, I was able to reuse my broken and dulled crayons from my younger years. And now have a very fun stocking stuffer for my busy body tot!  This will make coloring so fun for him and the crayons will be easier for his small hands to grab than those teeny tiny Crayolas.  I also was able to find boxes of crayons in the dollar bin at Michaels.  They're princess crayons, but after peeling off the labels and melting them down, they are now sports and underwater animals!

MATERIALS
Clean, empty soup cans
Crayons
Candy Molds (such as Wilton)
Big pot of boiling water

WHAT YOU DO
Peel off the wrappers of your crayons and break them into smaller pieces.  Separate by color into each of your soup cans.  Place the cans into your boiling water (water should be high enough to be above the crayons) and allow the crayon to melt.  This won't take very long.


Once the wax is melted, carefully pour it into your molds (or you can use a plastic spoon to spoon it into the mold).  Allow the wax to set a bit and then transfer to mold to your freezer or refrigerator.  Once the wax is cooled, it pops right out of the molds!


This may not be a project to do with your tot, but they will sure have fun coloring with these cool, new crayons!

Find free, printable coloring pages here:
Sesame Street
sproutonline.com
Disney